R2Con CTF - Land of Ecodelia
• • ☕️☕️☕️ 13 min readIntroduction
R2con is a yearly conference about radare2, a multi-platform, open-source, reverse engineering framework. As part of the conference they host a CTF, this year it was held a few days before the event, more details can be found here. The CTF consists of thirteen challenges across three levels: easy, medium, and hard. This post will walk through an easy level challenge that was particularly interesting, Land of Ecodelia, a text based adventure game.
Background
I have been using R2 sporadically for the past year for small bits and pieces like checking for compiler flags / writing small scripts to patch opcodes. During this time I’ve never used it as my primary reversing tool on a project / crackme, what better time to start than at a conference all about Radare2. The purpose of this post is to provide insight into practically applying R2 by itself and comment on the experience.
Reverse Engineering Time
Pre-analysis
The first step is to figure out what we’re dealing with, by running the file utility against the binary we can see ctf.file is a statically linked ELF64 binary that has been stripped.
> file ctf.file
ctf.file: ELF 64-bit LSB executable, x86-64, version 1 (SYSV), statically linked, stripped
This information and more is available in R2 by running the i utility. R2 recognises the binary as being written in go, as indicated by the lang go output. This is significant because each language has its own nuances, knowing them can significantly help when reversing. Notably, the -A flag simply instructs R2 to analyse all referenced code in the binary, this is important.
> r2 ctf.file -A
[0x00452f70]> i
...
size     0x15e7a0
humansz  1.4M
...
arch     x86
...
bintype  elf
bits     64
...
lang     go
...
static   true
stripped true
...
After doing a bit of digging I was quickly concerned because:
- I have little to no practical knowledge of go outside of reading blog posts from RedNaga.
- The Go compiler appears to insert a significant amount of boiler plate code, as illustrated by the size of the binary.
- The low-level calling convention used by the Go compiler on x86–64 targets is memory-heavy. Meaning all arguments and return values are always passed on the stack.
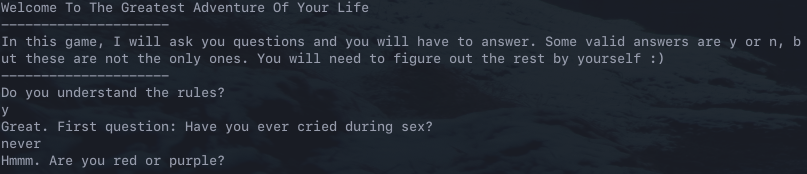
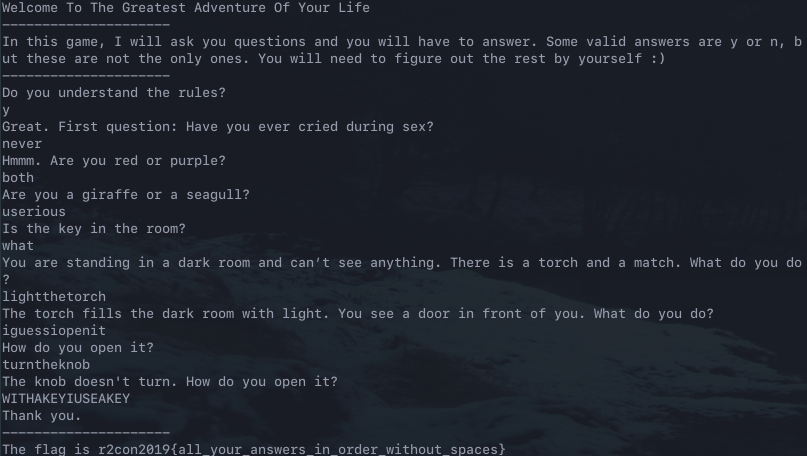
With this in mind, the next step is to actually run the binary to see what it does. The program appears to present a series of questions to the user, if answered incorrectly the process terminates.
Welcome To The Greatest Adventure Of Your Life
---------------------
In this game, I will ask you questions and youwill have to answer.Some
valid answers are y or n, but these are not the only ones. You will need
to figure out the rest by yourself :)
---------------------
Do you understand the rules?
y
Great. First question: Have you ever cried during sex?
what
Your poor decisions led you to your death. Sorry.
Static Analysis
This knowledge can now be applied to direct static analysis on the binary itself. Searching for known strings, such as the flag format r2con{<flag>}, is a good start. There are a number of hits for r2con when searching the whole binary using izz.
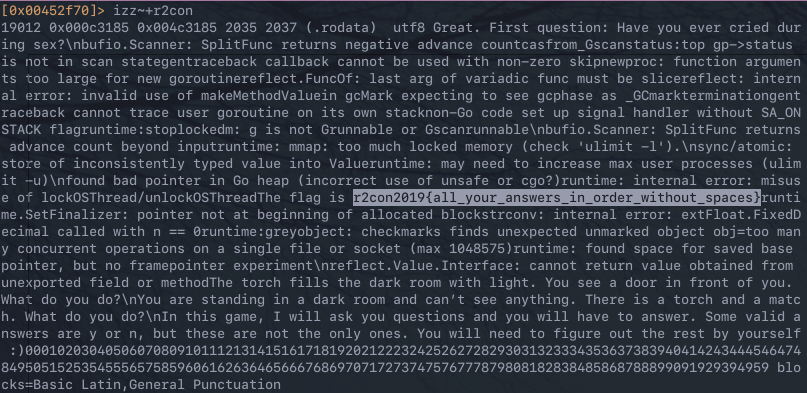
Unfortunately, r2con2019{all_your_answers_in_order_without_spaces} is not the flag. However, this does indicate that the answers to the questions are the flag. This can be confirmed by NOPing out the logic that verifies the answers provided by the user matches the expected answer, however, this is not covered and does not provide the flag. The next step is to look at where the string hit is used in relation to the rest of the binary. This can be done by using axt to search for cross references to the string at 0x000c3185.

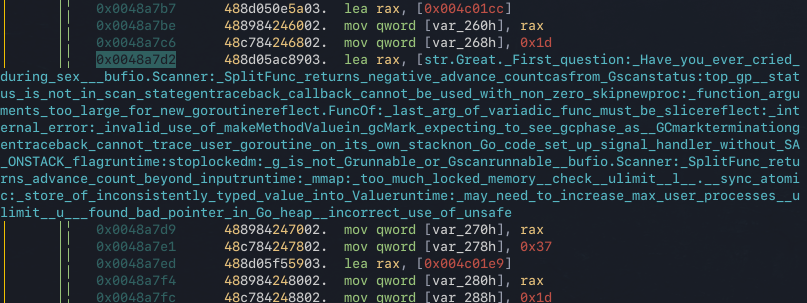
The string is referenced in the function sym.go.main.main at 0x48a7d2, however, it appears to be surrounded by a lot of logic that doesn’t seem relevant.
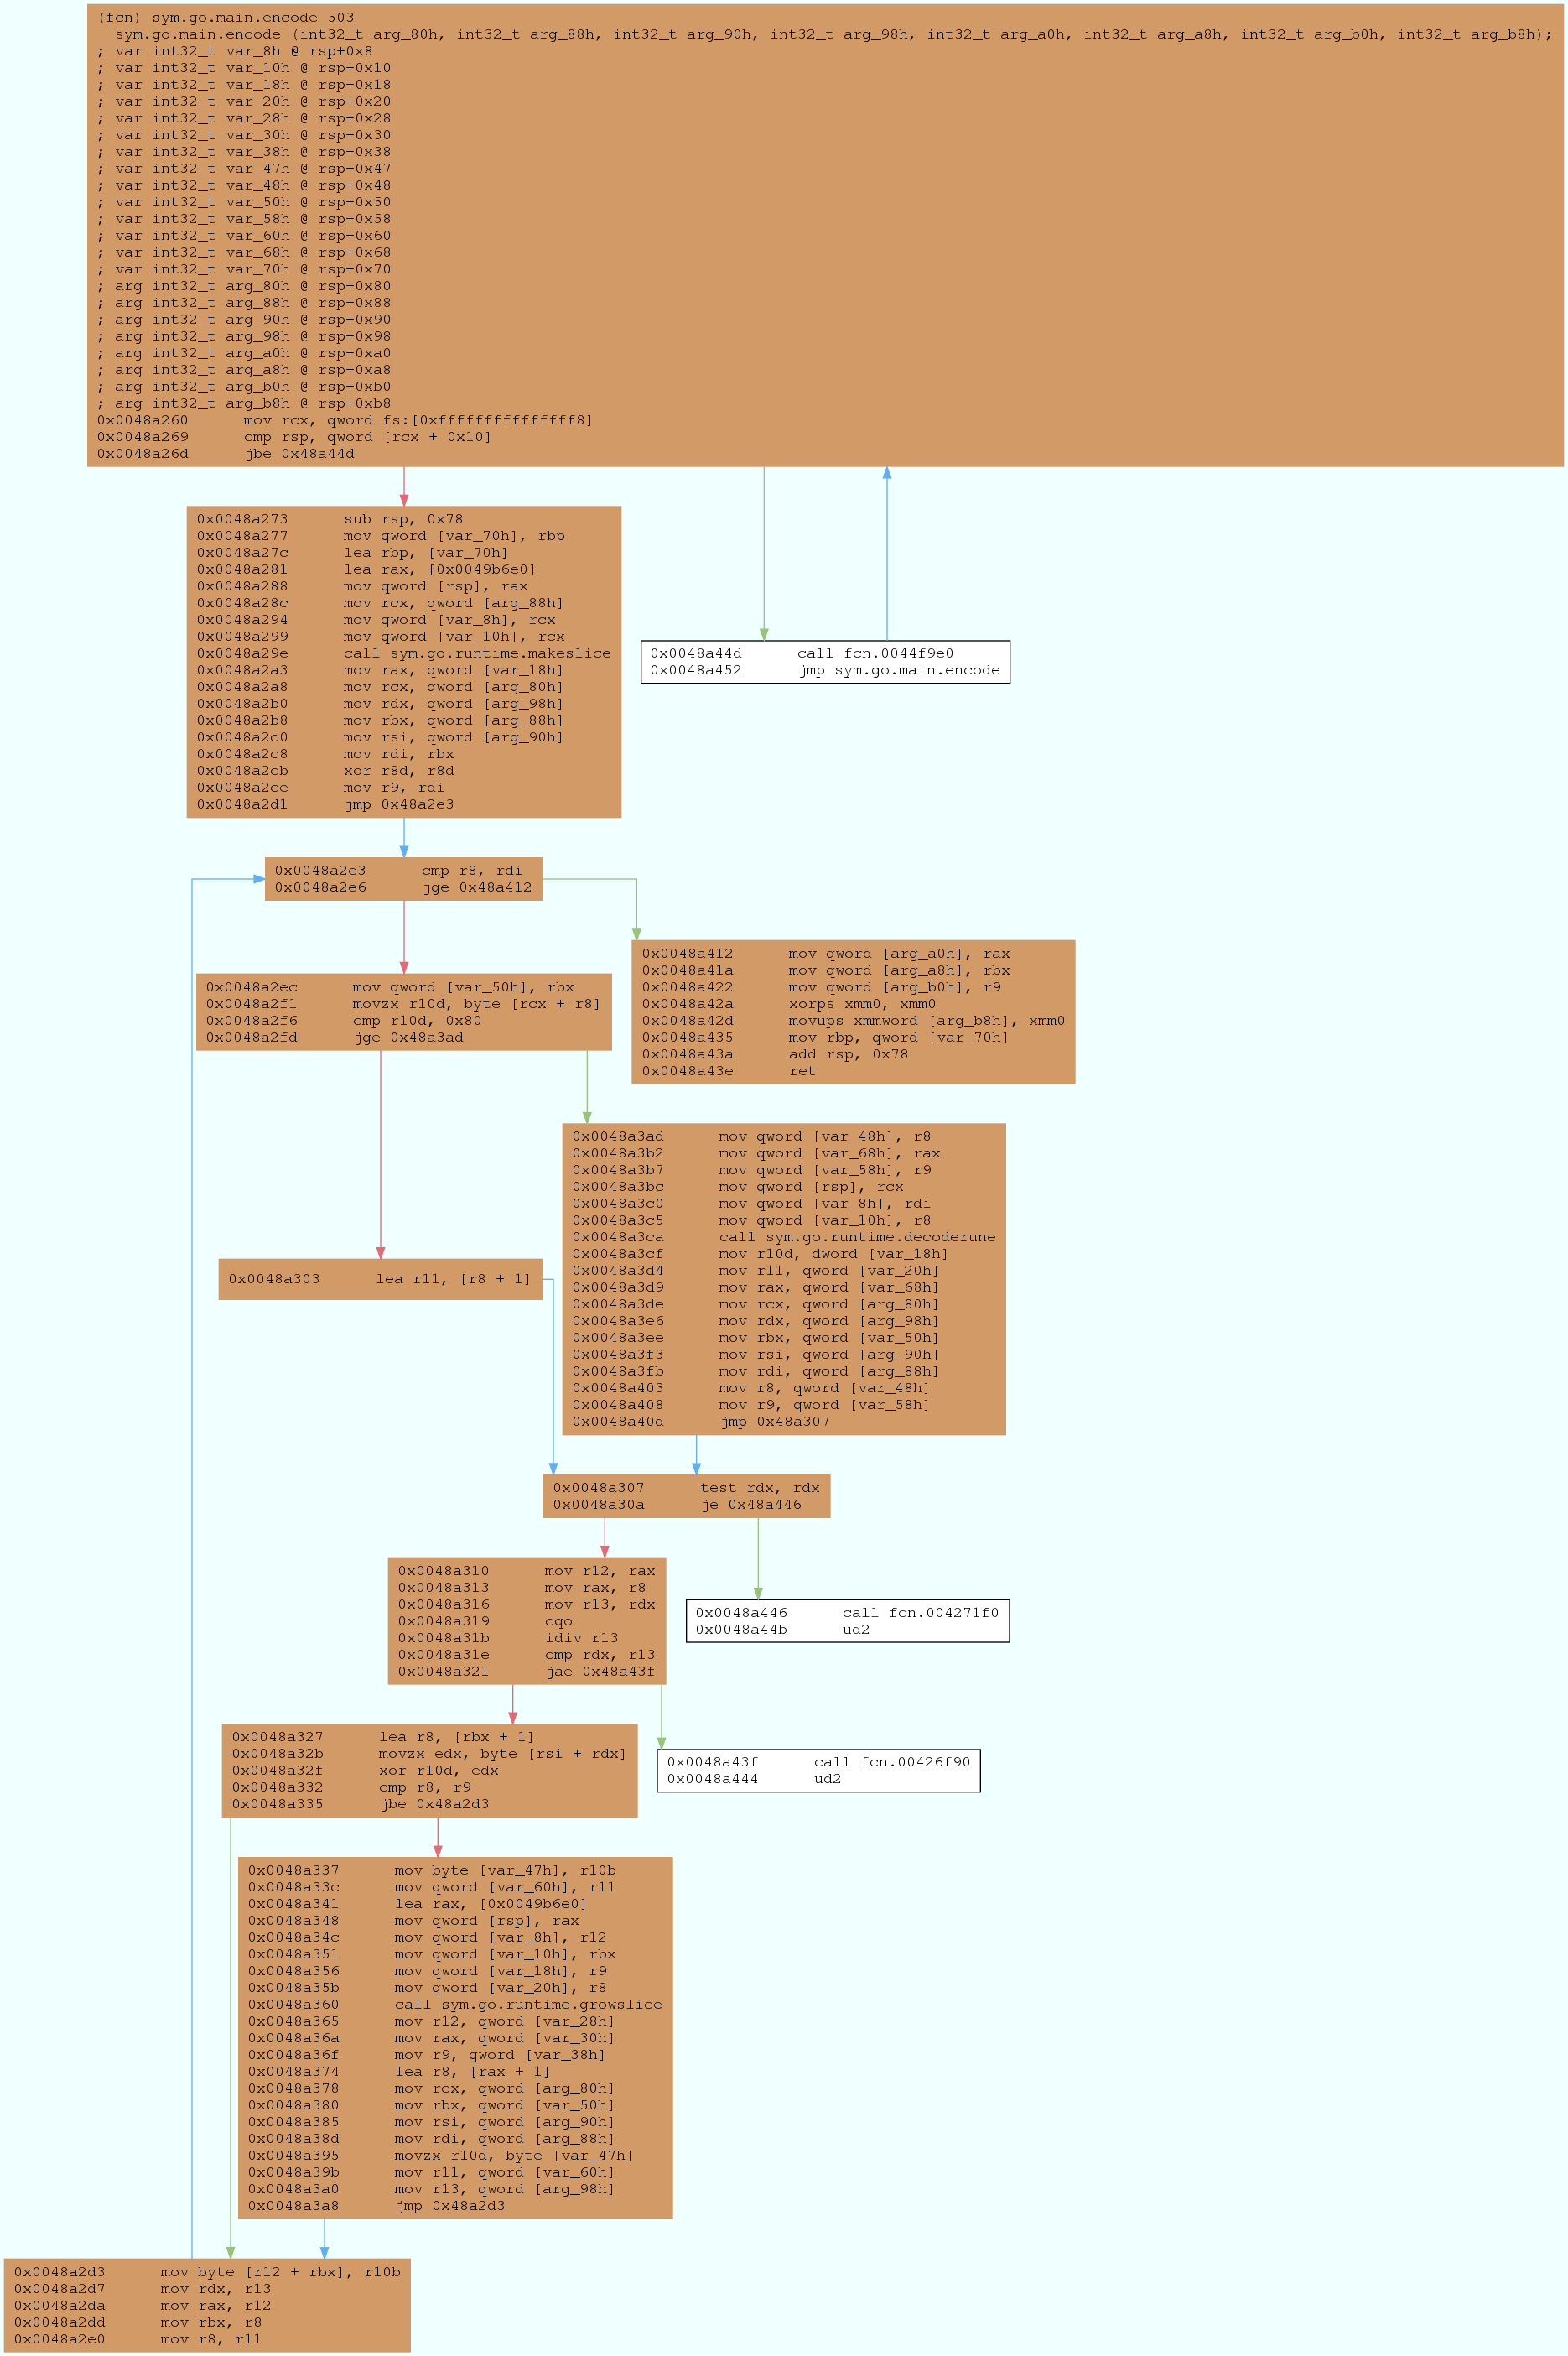
To get a better understanding of what the code does, R2 can generate a function call graph using agc. The terminal output of this is not really legible in a blog format, so agcd can be used to generate a Graphviz file and output to a png using dot.
[0x0048a460]> agcd > your_graph.dot
[0x0048a460]> !dot -T png your_graph.dot -o your_graph.graph
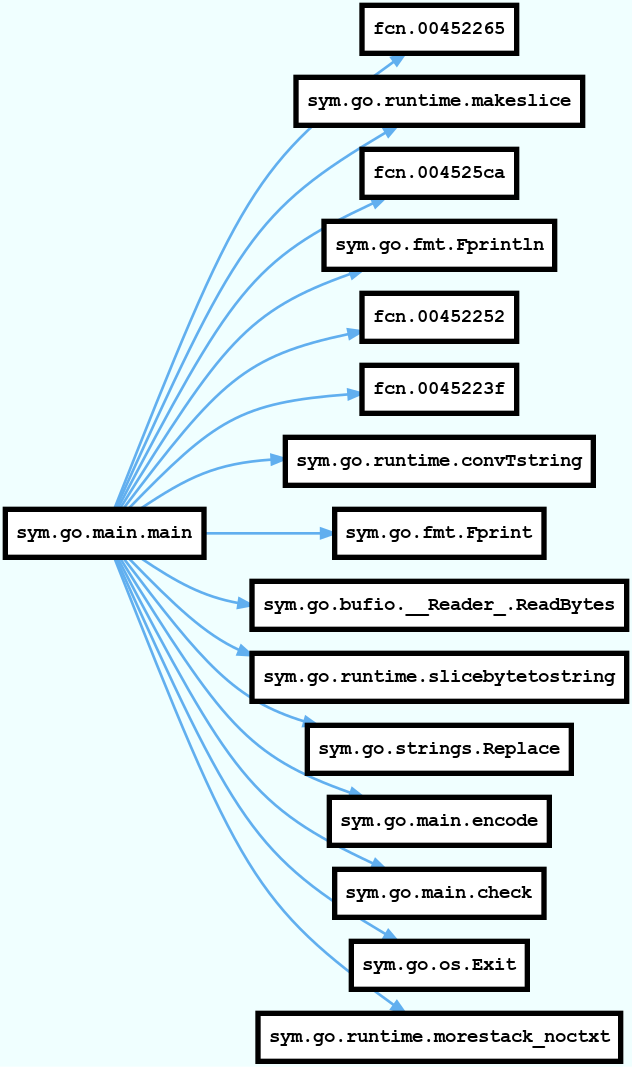
The call graph highlights that there are a number of interesting functions as part of sym.go, the afl utility can be used to list all the functions in the binary to see if there are any more. There are over 1500 hits to what is probably boiler plate go code, the search is further refined to sym.go.main to combat this. The output of the search did not reveal anything else particularly interesting so analysis is focused onto sym.go.main.check and sym.go.main.encode.

Check Function
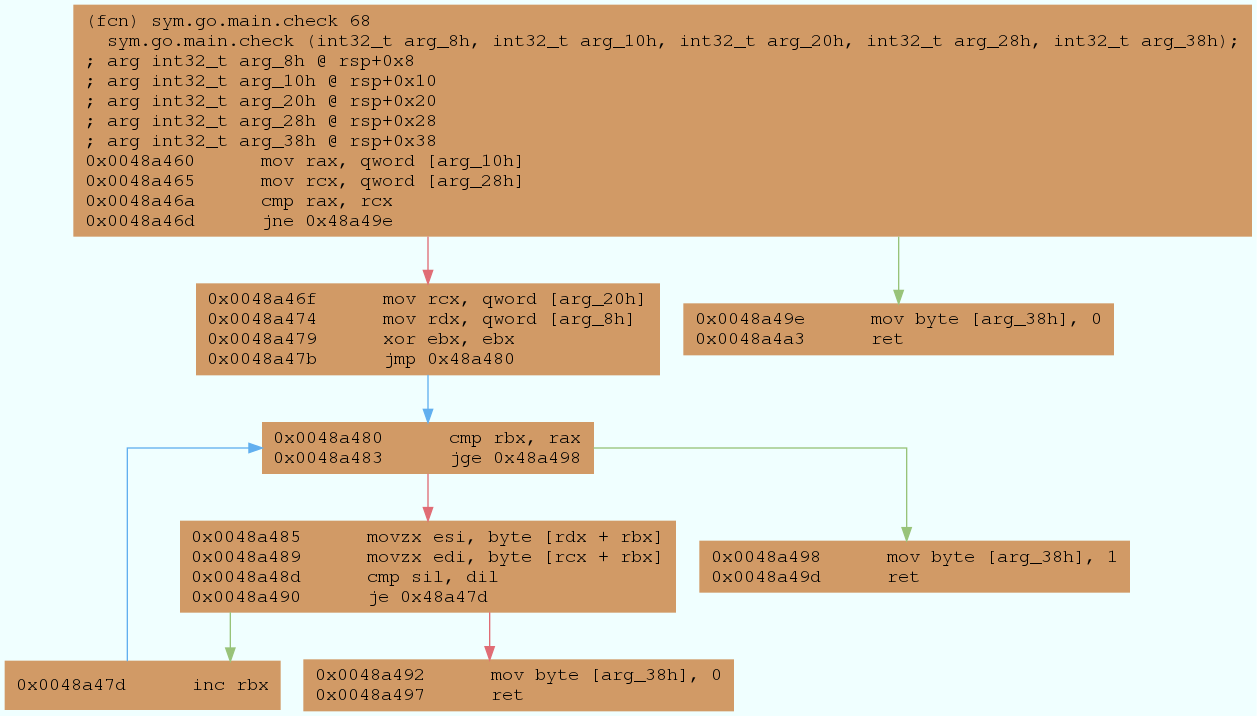
The first step is to analyse the disassembly of the function. To print the disassembly for the function in R2 use pdf @sym.go.main.check. The function appears to be comparing values and dereferencing pointers in a loop, most likely comparing two objects.

This becomes significantly clearer when viewing the function’s control flow graph. Use the agf utility to print the basic block function graph. The instruction at address 0x0048a46a looks interesting as it is comparing two dereferenced pointer values. Additionally, the instruction at address 0x0048a48d also appears interesting as it is comparing two dereferenced pointer values at an offset. Take note of the 0x0048a46a and 0x0048a48d addresses as it will feed into later analysis.
Encode Function
The next step is to look at the sym.go.main.encode function. Print the disassembly of the function using pdf @sym.go.encode and generated a control flow graph just like before. The function looks like it is doing some form of encoding as can be seen by the loops and XOR instructions. Generally speaking, XOR instructions are usually interesting in CTFs and the one at 0x0048a32f is no exception. Furthermore, this specific XOR is positioned quite late in the function which suggests it might be where the magic happens in an encoding function.
Dynamic Analysis
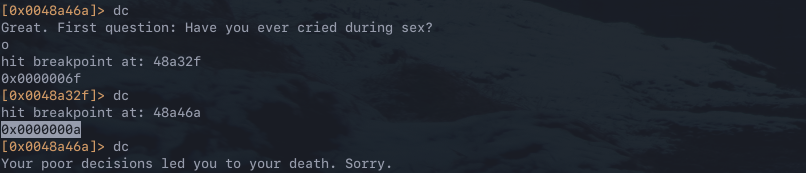
The next step is to take the information gathered from static analysis and use it to drive dynamic analysis to get a better understand of what is going on. The R2 inbuilt debugger can be used to facilitate this, attach a debugger to the process by running r2 -d ctf.file. Then set breakpoints at the points of interest 0x0048a46a, 0x0048a48d and 0x0048a32f by using the db <addr> command. Then continue execution in the debugger session by running the dc command. The breakpoint at 0x0048a32f hit first, dump the values of the registers by executing the dr command.
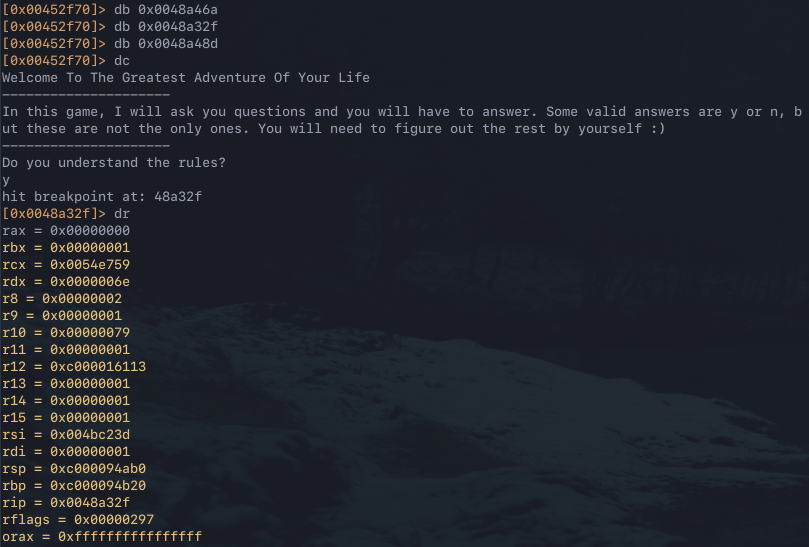
The breakpoint at 0x0048a32f inside of the encode function targets the instruction xor r10d, edx. RDX references an index value of RSI, as can be seen in the previous instruction at 0x0048a32b. This incidactes that the value changes with each loop and is therefore not static.
...
0x0048a32b      0fb61416       movzx edx, byte [rsi + rdx]
0x0048a32f      4131d2         xor r10d, edx
...
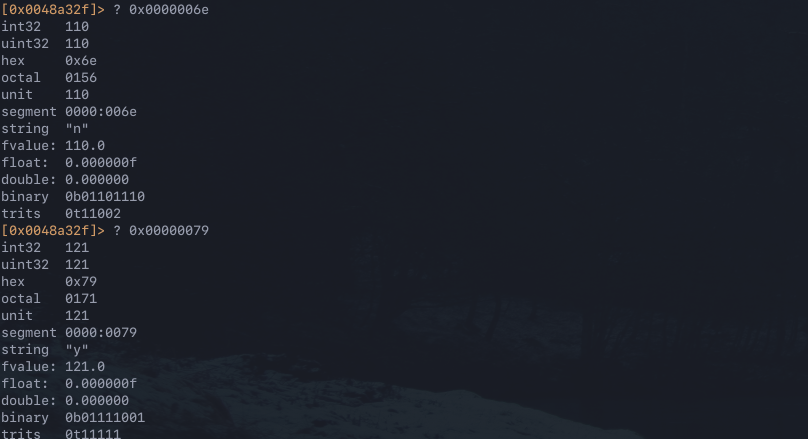
The R10 register contains the value entered by the user, in this case y. The RDX register contains what looks like the key, in this case n. Notably, the full key can be seen in RSI from the stack, this is because RDX contains an index value of RSI. R2 allows you to easily query data in different formats by using the ? <value> command.
Now that the key and logic for the encode function is clear, the execution of the binary can again continue by running dc. The next hit is the breakpoint at 0x0048a46a.
...
0x0048a460      488b442410     mov rax, qword [arg_10h]
0x0048a465      488b4c2428     mov rcx, qword [arg_28h]
0x0048a46a      4839c8         cmp rax, rcx
...
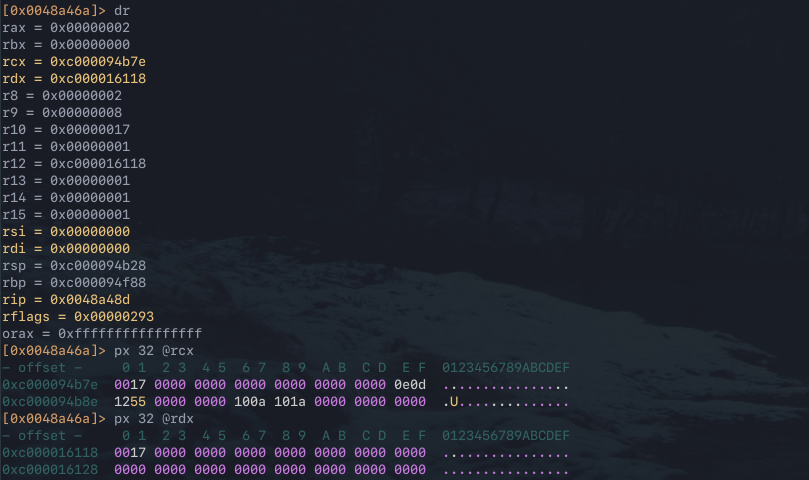
The instruction cmp rax, rcx at this address compares two values stored in RAX and RCX. The value of these registers are both 0x02.
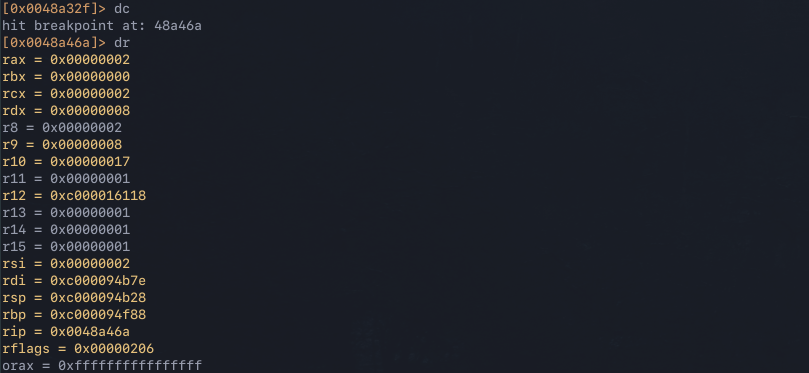
This looks like it may be comparing the length of the user’s answer against the expected length, performing a length check. This can be confirmed by re-running the binary and entering yy instead of y. Observe that the value of RDX is still 0x02, however, RAX is now 0x04 - 4 bytes instead of 2.

Now that the expected length of the answer can be extracted, the execution of the binary can continue by running dc again. The next hit is the breakpoint at 0x0048a48d.
...
0x0048a485 0fb6341a movzx esi, byte [rdx + rbx]
0x0048a489 0fb63c19 movzx edi, byte [rcx + rbx]
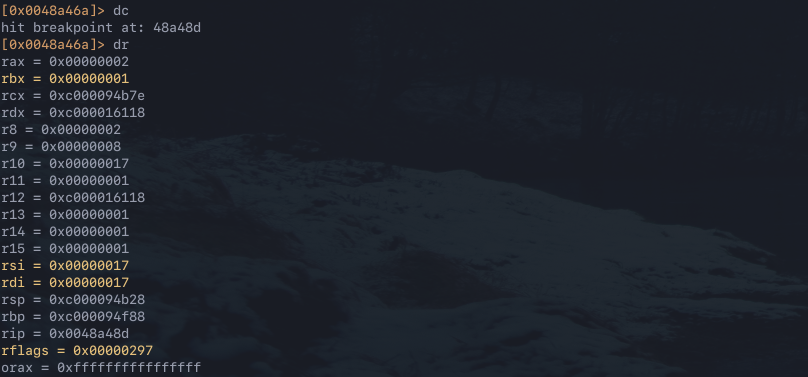
0x0048a48d 4038fe cmp sil, dil
...
The instruction at this address compares RSI and RDI, these registers are dereferencing pointer values from RDX and RCX at an offset. This means that RDX/RCX contain the full string, and RSI/RDI contain the current char being compared. The register values confirm that RCX and RDX contain addresses to pointers, this is verified by using px to print the hexdump of the addresses stored in each register.
Continue the execution of the binary again by running dc to see if the instruction is iterating over a string. The same breakpoint hits again and the RSI/ RDI registers contain the subsequent pointer value 0x17, in addition the RBX register is updated to indicate the base index of the loop.
Taking the key from the encode function for the first question 0x6e and XORing it with the value 0x17 reveals the the answer "y". R2 again offers a useful feature to perform this calculation by running ? <val1> ^ <val2>.

Executing Attack
Now that each of the pieces of the puzzle have been reversed, it’s time to put everything together. The snippet below simply sets up the breakpoints and uses the dbc utility to automatically run a command when a breakpoint is hit, this is used to extract the values of interest identified during dynamic testing at each breakpoint.
> cat config.txt

#Encode Function
db 0x0048a32f
# Print key for current byte
dbc 0x0048a32f dr rdx

# Compare Function
db 0x0048a46a
# Get the expected length
dbc 0x0048a46a dr rcx

# Compare byte value
db 0x0048a48d
# Get the correct value
dbc 0x0048a48d dr rcx
The config file can be passed into a R2 session through the -i flag, as seen below. Notably, breakpoints / the commands assigned to them can be verified by running the db command by itself.
r2 -d ctf.file -i setup.txt
[0x00452f70]> db
0x0048a32f - 0x0048a330 1 --x sw break enabled cmd="dr rdx" cond="" name="0x0048a32f" module="<path>/ctf.file"
0x0048a46a - 0x0048a46b 1 --x sw break enabled cmd="dr rcx" cond="" name="0x0048a46a" module="<path>/ctf.file"
0x0048a48d - 0x0048a48e 1 --x sw break enabled cmd="dr rdi" cond="" name="0x0048a48d" module="<path>/ctf.file"
To demonstrate how this attack would work in practice, the process developed is applied against the second question. As the length of the answer is unknown, the first step is to figure out the expected answer length. Step through the question until 0x48a46a and print the result of the RDX register, this contains the value 0x0a. 0x0a is 10 in decimal, a single char is two bytes so 10/2=5, meaning the answer to the next question is five characters long.
The next step is to get the encoding keys and the encoded answer. The keys are different for each byte of the encoded answer, as can be seen by the value of the RDX register at the 0x0048a32f breakpoint changing after each hit. Additionally, the full encoded answer 01 0356 061d can be found by printing the pointer address stored in RCX when 0x0048a48d is hit.

The final step is to decode each individual byte of the answer with each respective key.
0x6f ^ 0x01 = n
0x66 ^ 0x03 = e
0x20 ^ 0x56 = v
0x63 ^ 0x06 = e
0x6f ^ 0x1d = r
The answer to the second question is never, and this allows the application to progress to the next question.
These exact same steps are repeated for every question. A Python script can be used to speed up the XORing as seen below. The snippet simply XORs an array of keys against an array of encoded answers.
import r2pipe

r2 = r2pipe.open('-')

keys = [
"0x0000006f",
"0x00000066",
"0x00000020",
"0x00000063",
"0x0000006f",
"0x0000000a"
]

encoded_bytes = [
"0x01",
"0x03",
"0x56",
"0x06",
"0x1d"
]

answer = ''

for index, eb in enumerate(encoded_bytes):
    res = r2.cmd('? {}^{}'.format(eb, keys[index])).split('\n')
    print("-> eb({}) ^ key({}) = {}".format(eb, keys[index], res[6][-2]))
    answer +=res[6][-2]

print("-"*20, "Answer", "-"*20)
print (answer)

Once this process has been completed against all of the questions to get all of the answers, concatenate all of the answers to construct the flag:
r2con2019{yneverbothuseriouswhatlightthetorchiguessiopenitturntheknobWITHAKEYIUSEAKEY}
Conclusion
Land of Ecodelia is a really interesting and creative CTF challenge. The mechanic of making the flag a concatenation of each answer is really smart, it forces the attacker to play the game and think - I really enjoyed that. In addition, this challenge forced me to learn more about Go which was annoying but also rewarding, so all in all I really enjoyed it.
In regards to R2, the tool is extremely powerful and has a great community supporting it. Despite all of its shortcomings and limitations, it is incredibly impressive, especially considering it is free and open-source. If you are new to R2 I would highly recommend starting out with Cutter, the official GUI platform built on Radare2, it takes away a lot of the pain and it has a really nice UI. Alternatively, if you like a bit more of a challenge you can use tools like r2lrn or r2golf to practice using R2 and get some hands on experience.
If you’re interested in finding out more about the CTF / want to get a different perspective I would recommend checking out the following write-ups: xermicus and bananamafia.